If you are relatively new to spoon carving, I feel your excitement and pain (the pain being the multiple nicks on your hands - safety first), breaking your first spoon in half, wondering how you can get good at carving without ever learning how to sharpen your tools, and more. As well as the overwhelmingly exciting frustration of not knowing what you are doing.
If you are relatively new to me, my name is Joe Samalin and I work wood as a serious hobby with a background in a bit of opera set building, timber framing, and more. I take whatever wood classes I can and spend a lot of time reading and on Youtube. I lived in Japan for 5 years, and while my main career for 20+ years is and remains gender-violence prevention, I work 4 days a week here at Tools for Working Wood in Brooklyn, NY alongside the owners Joel and Sally, and the folks in shipping, receiving, customer service, and the team who design and produce the tools we make in-house. You can check out our tool lines at Gramercy Tools and BT&C.
When the coronavirus hit NYC I lost access to the local shop where I used to build, and living in a Queens, NY apartment on the 6th floor is not conducive to having a shop at home. What’s a maker to do?
Spoons.
I am not a carver by any stretch of the imagination, and was excited to do something new, not prohibitively expensive (though anything can become so without some shopping discipline - you know exactly what I mean), and something that would challenge my view of myself as not artistic or creative. And so, spoons. I started carving about 4 months ago and surprised myself by sticking with it - ADHD and imposter syndrome can make learning curves tough for me. But I did it. And my spoons are not looking half-bad these days, if I do say so myself.
Tools For Working Wood is seeing a big bump in numbers of people looking to get into green woodworking generally, and spoon and bowl carving more specifically. COVID19 time on your hands? Newest hipster Brooklyn fad, or a harkening back to the good old hand tool days? Great handmade gifts or a new side hustle if you get good enough? Undoubtedly a mix of all of the above and zero judgement here.
We love seeing this renewed interest in carving and will be sharing more carving info via posts on our Build-it-Blog; and more including a new, soon-to-be-released carving tool designed and produced by us right here at Tools For Working Wood!!
I’ve already said too much.
I am happy enough with my spoon carving now that I am excited to jump into decorating my spoons. Joel asked me to focus on things I am actually doing so I will be writing in the near future on the actual shaping and cutting of wood, but what I am doing new is finishing the spoons I have. Finishing can include certain stains, paints, and other finishes, as well as a few other really cool techniques I learned about by joining as many green woodworking and spoon carving groups as I could find on social media (something I recommend doing). So a bit on one of my favorite finishes in general and now for spoons - and a great finish for beginners - milk paint.
I first encountered milk paint thanks to Nancy Hiller - a brilliant cabinet maker, hilarious writer, and stellar human being. Tools for Working Wood carries all her books and you should definitely check them out. I was lucky enough to meet and take a class on milk paint with Nancy when I lived in Indiana.
*TL;DR Milk paint is a non-toxic, environmentally friendly finish for wood that dries quickly and is very easy to use. Because it is water-based, it soaks into the wood and you can put on thinner coats than other paints. It doesn’t contain solvents and is odor-free. Milk paint comes in powder form and is simply mixed with warm water to use, which means depending how much water you use you can create a transparent wash leaving the grain visible or a solid coat of paint. There are a wide range of colors available, and you can mix colors as well for limitless possibilities.
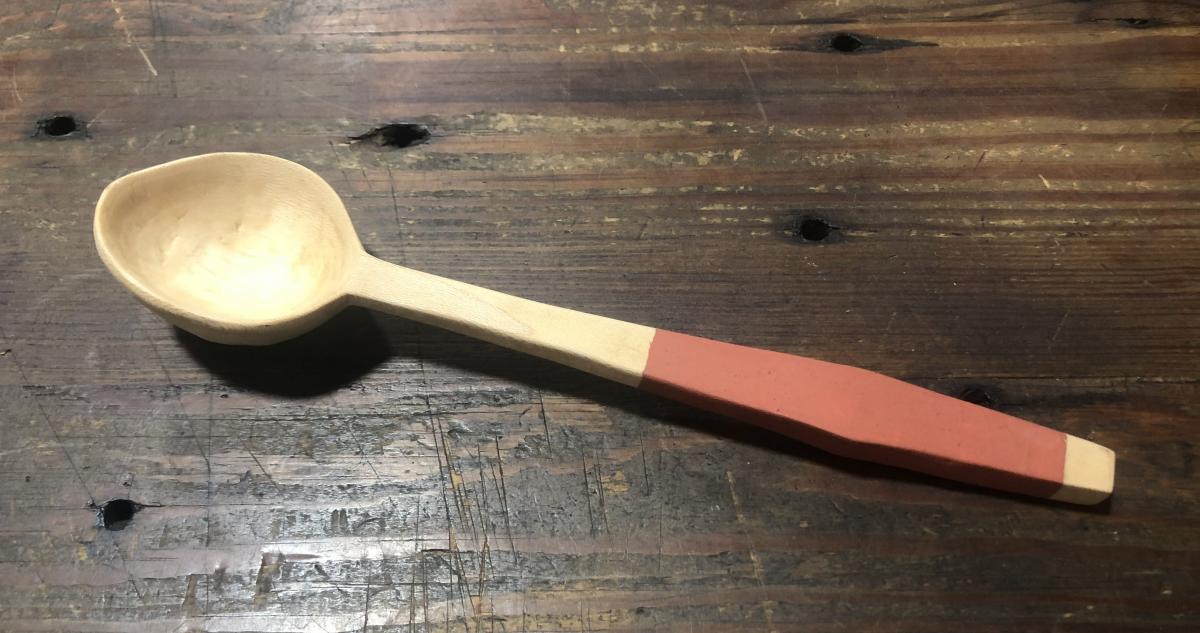
Milk paint is best for spoon handle decoration, less so for the bowl. For my first attempt I took a very early small-sized serving spoon I made and used a single solid coat on the handle, mixed 1:1 with hot water. Milk paint often has a bit of a chalky feel to it and I really liked that for the grip on this spoon. I then finished the spoon with Tried and True original oil, a mix of linseed oil and beeswax, which gave the spoon a warm, creamy glow...I like how the simple angles on the handle look with the paint (it even distracts from the slightly misshapen bowl!), and it really showed me how things can look good even without high skill fancier techniques.
Below is a shot of four spoons that are both pretty recent and ones that I like. I left out the mistakes, failures, and stuff that ended up pretty darn ugly or useless - and there were a lot of them.
Questions?! Feel free to get in touch at joe@toolsforworkingwood.com or leave a comment, and follow us on Instagram as well @toolsforworkingwood. Share your carving/woodworking pics and tag us so we can connect and support you all better.
Some of the other spoons I have recently made that I like.
Join the conversation
08/24/2020 Marisa
Enjoyed your blog Joe. While I don’t do any woodwork myself, I do use wooden spoons for spices so this is interesting - esp the non toxic paint.
09/08/2020 Joe Samalin
Marisa,
Thanks so much for the kind message. I will have to make a few spoons for you!


 Joel's Blog
 Built-It Blog
 Video Roundup
 Classes & Events
 Work Magazine
Thanks so much for the kind message. I will have to make a few spoons for you!
Joe S